by P J Chandler
Supplement to The Barefoot Beekeeper
available from
www.biobees.com
This ebook also available in DNL and EXE format.

INTRODUCTION
My woodworking skills are little more than basic and I have written these instructions with
fellow amateurs in mind. I doubt if I could follow a 'proper' woodwork plan myself, so this is
a combination of written instructions and photographs, which I hope will prove easy to
understand. I suggest you scan through the following pages more than once before starting
work.
MATERIALS
Traditionally, beehives are made from Western Red Cedar, which will weather pretty well
without treatment. However, it is not easy to find and it is quite expensive when you do, so
Douglas Fir or any straight-grained, well-seasoned pine will do the job. It can be weatherproofed
with the linseed oil + beeswax mixture already described 1.
You will need a quantity of timber, about 3/4” thick and 12” wide. If you cannot find 12”
wide boards locally, you can glue up 6” boards, which is how I have done it in the
photographs that follow.
For a 36” hive, you will need three lengths of 12” x 36”, with one cut into two 18” x 12”
pieces for the ends. The floorboard is 36” x 6” and the legs are the same, cut lengthwise to
3” wide. You will also need a board 11” x at least 25” for the follower boards and for the top
bars, 30 feet of 1 3/8” x 3/4” straight timber.
For a 48” hive, you obviously need an extra foot on each side and the floor, plus enough for another 8 or so top bars.
Of course, you can build a hive any length you choose, but these dimensions work well –
certainly in temperate zones - and are convenient for both beekeepers and bees.
For the hive body, you will also need a dozen 2 1/2” brass or stainless steel wood screws,
eight 2” stainless or galvanised bolts with nuts and washers and a 3-4' x 6” length of
plastic, galvanised or stainless mesh with about 8-10 holes to the inch and a handful of
flat-headed pins to fix it with.
What size hive to build?
If you are a first-time beekeeper and currently have no ambitions to keep more than one or
two hives, I suggest you start with a 36” long box. If you have some experience with
conventional hives and want to start nucs and run four or five or more colonies, then go for
the more capacious 48” model.
You will need a flat bench somewhat longer and wider than the hive you are building,
along with some basic tools: carpenter's saw; plane; screwdriver; drill; square; cramps. A
hand-held or bench-mounted circular saw and a power drill are handy if you have them.
Use a strong, waterproof, external grade glue for all permanent joints. You don't need to
go as far as epoxy resin glues, but if in doubt, ask in your local hardware shop for advice.
Both long and short hives are built in exactly the same way - inside out and upside down
- starting with the follower boards. The reason for this will become clear and hinges on the
relative ease of making the sides fit the followers and the near impossibility – for the
amateur woodworker – of making the followers fit retrospectively to the sides.
I would suggest that you spend some time studying the sequence of photographs and get a feel for how the hive looks and how it works. Please send me a message from my web site
if you feel that I have missed anything or you have suggestions for improvements.
You don't need a fully-equipped workshop: a flat surface and basic tools are the essentials.
You can build the hive using only hand tools – and a circular saw is a bonus, whether handheld or
table mounted.

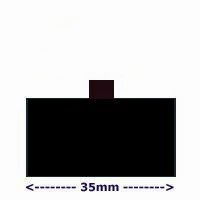
The one critical dimension in this whole design is the width of the
top bar, which is, according to people who have been doing this
longer than I have, 1 3/8” or 35mm for most bees. If local
knowledge or your own experience say otherwise, then follow that.
Otherwise, I suggest you start with these dimensions and watch how
the bees build their comb.
You will get more even and predictable results if you provide the
bees with a straight comb-building guide of some kind. There are a
number of ways to do this, perhaps the simplest being a saw kerf
down the centre of one face of the bar, made with a circular saw.
This does not have to extend to the ends, but it may be easier to
cut longer lengths like this. The groove should be about 1/8” deep
and the width of your saw blade. Fill it with molten wax and allow
to cool.
If you do not have access to a circular saw, you can pin thin
strips of wood, about 9” long, centrally onto the bars, as in the
second diagram. Rubbing the bottom edge with beeswax is
generally thought to be a good idea.
For this particular design, the top bars are 17” long, which seems to be a convenient
length for both bees and beekeeper. Make them about 3/4” thick.

ASSEMBLY
The first step is to assembleyour materials and cut andglue the boards to their finalsizes. Make up the sides andends as shown and while theglue is setting, make the allimportant follower boards.
Glue and screw or pin a standard 17"top bar to the top edge of each follower board. Placing thin strips of woodunderneath ensures that it is laterally centred. Clamp it up and leave to set.The extra bits of scrap wood preventthe boards 'springing' while clamped.
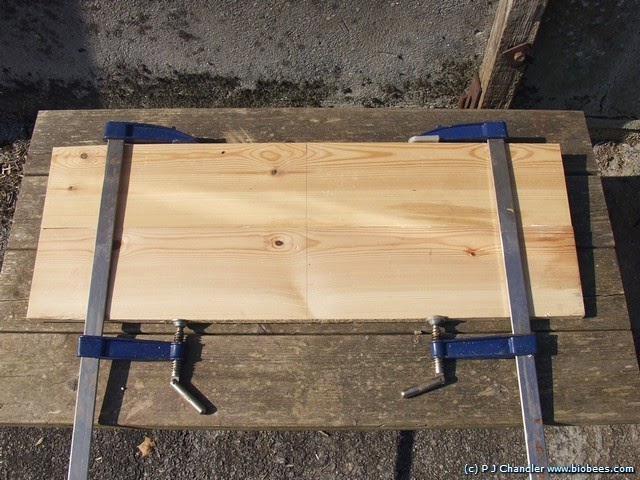
This 11” board, here made up from three pieces, will become the follower boards. 1/2" timber is adequate for this job: mark 15" across the top edge and halfway at 7 1/2".

Draw a centre line to the bottom edge

Mark 2.5 inches either side of centre on the bottom edge


Extend the geometry to make an identical shape upside down, saving time and timber.

Glue, pin (or screw) a top bar centred on the top edge of each follower board. Cramp and leave to
set overnight.
A GEOMETRICAL FOOTNOTE (only for the mathematically inclined)
You may have noticed that the trapezoidal shape of the follower boards comprises a
rectangle, 5” wide by 11” tall, with a point-down, right-angled triangle on each side.
The height of each triangle is 11” and the base (or top) is 5”, so from Pythagorus we can
calculate the hypoteneuse (long side) as:
√h = 112 + 5 2 = 121 + 25 = v146 = 12.08
In other words, A tiny bit over 12”.
This means that, if your measuring and your sawing are accurate, you will need to shave a
little wood off the bottom of the follower board so that it is a snug fit to the inner edge of
the sides. Don't do this until you have the sides in place and you can see just how good
your drawing and sawing really are!
LEGS
You will need to let the glue set overnight before you move on to the main assembly, but if
you have time in hand today, you may as well cut and drill the legs.
You need four legs (obviously), each about 3” x 1” and a length to suit your height. For
example, man of average height will need the top of the hive to be around 30-31” for
comfortable working, so the legs will need to be about 32-33” long. If you are a wheelchair
user, you may want the top of the hive to be about 24” from the ground, so make the legs
26”. The rule of thumb: decide a working height for the top of the hive and add 2” to arrive
at the length of the legs. They will be trimmed a little to accommodate the roof – see below.
You do not have to use legs – you could put these hives on various types of stand as used
by conventional hives – but this is a cheap and convenient way of achieving a stable, level,
rodent-proof and probably more-or-less raccoon-proof hive at the right working height.
The legs will be bolted to the end pieces, using galvanised or stainless steel nuts and 2”
bolts. I advise you to put washers under the head of the bolts and the nuts to prevent them
cutting into the wood. Do not be tempted to use wood screws to attach the legs: disaster
will inevitably follow and you will regret not spending the extra few pence.
The lower ends of the legs can be left cut square for maximum stability on a grassed site,
or cut level if you intend to keep your hives on hard standing.

Begin the main assembly by inverting the follower boards and squaring them up
on your bench about 18”-24” apart. They should be parallel.
The hive is built upside down and inside out. The follower boards represent the 'inside' and now you are about to add the outer skin.

Position one of the side panels against the follower boards, resting on the top bars.
 A small nail tapped into the top bar
prevents the side panel from slipping off.

Place the other side in position and square up the structure, ready for the ends.

Position one of the end pieces centrally against one end. Its bottom edge rests on the
bench, giving clearance for top bars. (The plane is not necessary - I used it as a prop
as I was photographing single-handed)

Make a line where the end touches the sides, inside and out. (A friendly ghost helped me with this one...)

Remove the end and mark three points each side for drilling clearance holes for
screws. Actual positions are not as important as making them on the centre line and
away from the ends.

Use a drill bit slightly bigger than the shank of the screw, which should be brass and
at least 2 1/2" long. Drill both ends together, using the marked end as a pattern.
(The nails are dropped into two drilled holes to ensure alignment.)

While you are drilling, you may as well make bolt holes in the legs and end pieces.
Mark a point 5" in from the top corner of one of the ends and draw a line to the
bottom corner, as shown. The outer edge of the leg will lie on this line. Drill the top
hole at least 3" from the top edge, as the tops of the legs will soon be trimmed to
accommodate the lid (see below). Ensure that the lower hole falls comfortably
outside the line of the side wall.

edge. Lining up the holes you already drilled, mark a straight line across the width of one end,
2" from the top edge. Don't fit legs yet.

Plastic, galvanized or stainless steel mesh may be used to cover the base of the hive. This is heavy
duty plastic garden mesh, which has the advantage of forming a flexible, convex curve inside the
hive, enabling the follower boards to form a bee-proof and moth-proof seal. It must be cut carefully
to fit the ends and held in place with flat-headed pins or tacks.

Glue and pin strips of thin wood inside at the ends, to ensure there are no gaps. Cut them to the
shape of the lower ends of the follower boards.

A solid floor board is, I think, a necessity for winter in northern Europe, Canada and the northern
states of the USA. This one is a length of 6" x 3/4" timber and can be fixed in place using brass
snap-locks or some other method of your own devizing. Corrugated plastic sheet (as may be used
for the roof) is a lightweight and inexpensive alternative.

The bees will need an entrance! Drill three 1" (25mm) diameter holes, 2" from the floor, with one in
the centre and the other two about 3" either side. Champagne corks or the type (shown here) for
closing 1 gal. jars will allow you to regulate the openings.

If you are building the longer (48") version, make another two entrances on the opposite side of the hive
to the main entrances, about 4-5" from each end. This provides for making splits, nuclei and artificial
swarming and is one of the unique features of this design.

This is what your hive should look like now. The follower boards are a good, sliding fit and the whole
thing looks sturdy ad almost ready for bees!

You can see here how the roof frame is made - a simple, rectangular frame of 3" x 3/4" timber,
glued and screwed at the corners. Be sure to leave about 1/4" slack in both directions to allow
movement in the wood. Jamming roofs are a nuisance.

A simple roof using corrugated plastic, available from DIY stores.

Adding triangular gables makes a more elegant roof that will shed water quickly and
be hard even for strong winds to lift, but easy for the beekeeper. The roof covering is
plastic sandwich sheeting - the type used by estate agents for their signs. You can get
offcuts of this stuff for nothing at signmakers' shops. You could use a number of
materials here, including thatch, but make sure you keep it reasonably light.
Your last job is to coat the outer surface of the hive with something to keep the weather
out. Creosote, Cuprinol and various paints and varnishes will be suggested by old
beekeeping hands, but I prefer not to put anything onto or into the hive that I would not be
willing to put on my skin, so I use a bee-friendly coating made as follows:
To 1 litre linseed oil (raw or boiled, it matters not as you are about to boil it anyway) add 50
ml melted beeswax (use 1:20 ratio with whatever units suit you). Heat in a double boiler
(bain marie; or one sucepan inside another – the larger one containing a couple of inches of
water). Get it as hot as boiling water will allow and stir for 10 minutes. Allow to cool and
while still on the hottish side of warm, paint it on the outside of your hive, paying special
attention to end grain, nail heads (underneath) and joints.
There is no need to coat the inside of the hive: the bees will do that for themselves with
propolis.
You will also need some bees!
See The Barefoot Beekeeper for information on introducing bees and general hive
management.
A TOP BAR STAND
This device is easy to build and a very useful 'third hand' for examining comb, especially
when you need to do more than just look at it. I dreamed it up in bed one Sunday morning
and built it before lunch out of odd bits and pieces lying around in my workshop. No doubt you can think of other ways of building such a gadget.
The base is the same width as a top bar – 17” - and about 6” wide. The wire is about the same guage used for coat hangers, bent to accommodate the width of a top bar. A slight inward 'spring' is an advantage, as this grips the comb and helps to keep the top bar in position.


Here is the top bar stand on the bench...

...and folded for transport
REFINEMENTS AND ADDITIONS
If you are of an inventive turn of mind, you may already have thought of some
improvements and extra bits for your hive. Don't let me stop you, but do bear in mind that
the essence of 'barefoot beekeeping' is simplicity: resist the temptation to over-complicate.
Having said that, you might want to consider adding a 'landing board' for the bees, similar
to those you may have seen on WBC hives. I suspect this idea originated with Victorian
beekeepers, who were fond of designing hives that resembled Georgian buildings,
sometimes even having Doric columns either side of the entrance, but some people like
them, even if the bees couldn't care one way or the other. A landing board – say 6” wide by
2” deep and 3/4” thick – could be added just below the central entrance holes, using a thin
piece of wood as a support.
Pollen collectors are a useful means of gathering surplus pollen, either for one's own use or
for drying and storing for the bees in case of dearth. In my area (south west England) there
is rarely any shortage of pollen in the spring when bees need it most, thanks to plentiful
willow, hazel and dandelions, but in other areas this may not be the case. I am still
working on a design for a simple pollen collector and this will appear on my web site when
ready, as will other notes and developments.
Please keep an eye on www.biobees.com for updates.
Happy beekeeping!
This ebook is published as a supplement to The Barefoot Beekeeper,
which contains the philosophy and management techniques
appropriate for this hive. You can download this and other
information about sustainable beekeeping from
www.biobees.com